
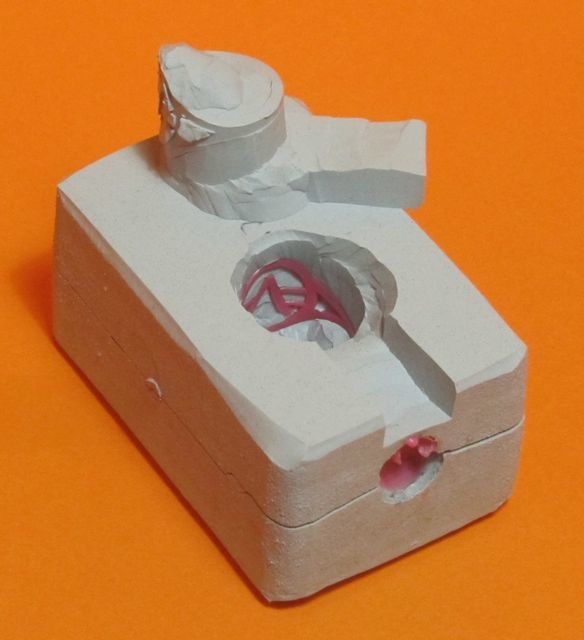
Plug Mold
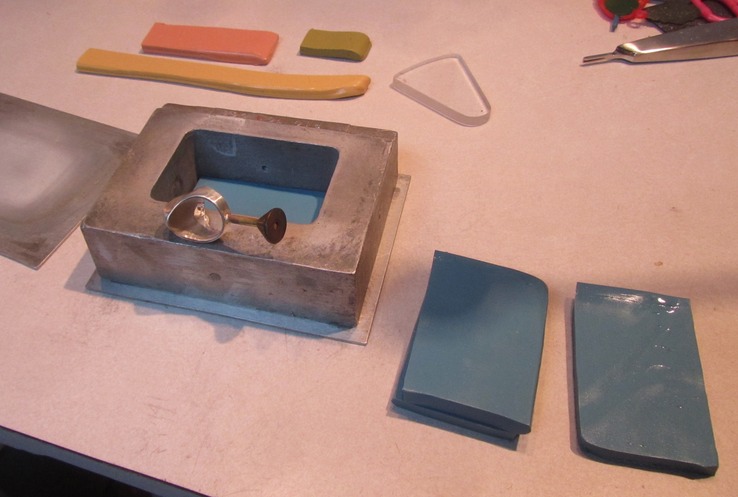
A friend asked how to cut a dome ring mold. Here is a very rough approximation of his model. I made the ring just so I could make the mold. :-)
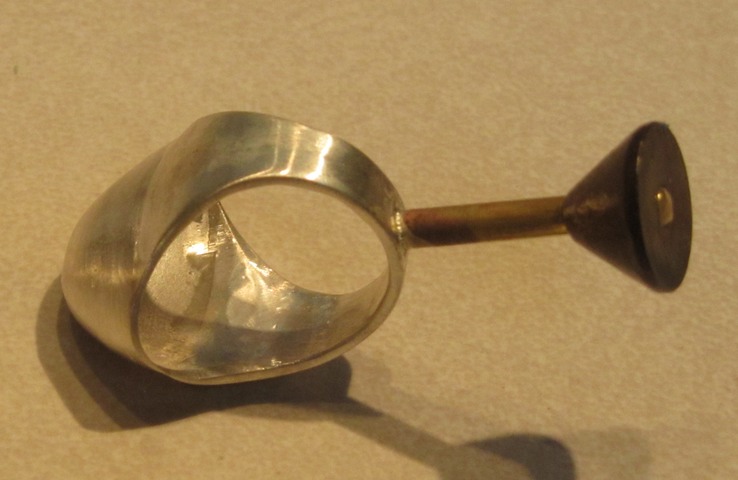
Sprue former on the right end of the picture, silver model on the left. Note that the dome is very hollow.
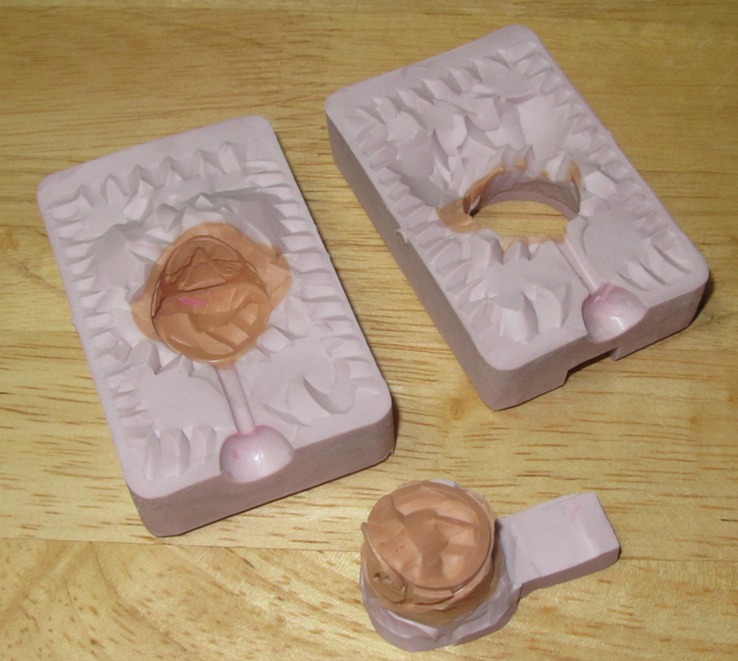
The video I am working on will demostrate how to cut this type of plug mold. It is good for very thin objects with large inside spaces that need to be removed from the wax.
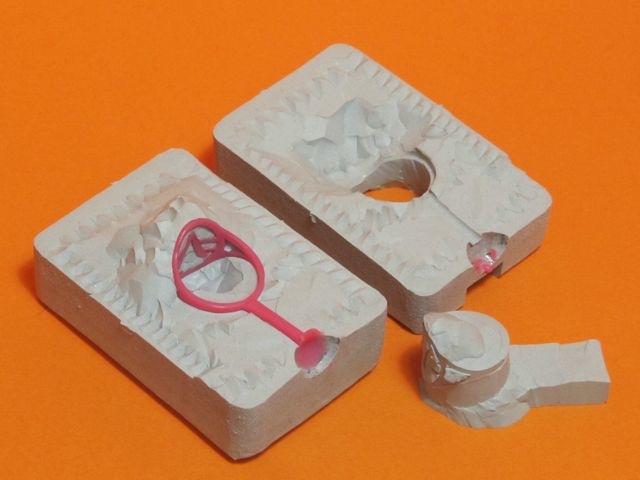
Note that the plug has an outer ring that carries the impression of the inside of the ring shank. There is an 'S' shaped bar that fills the center of the plug.
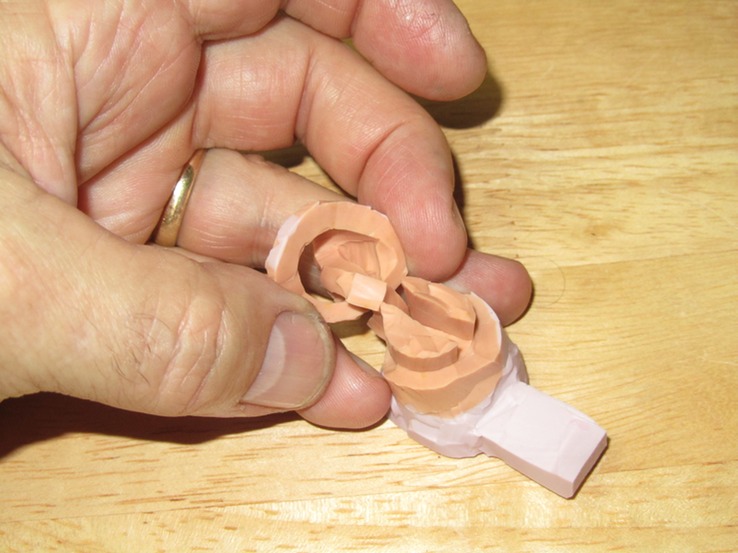
This shows how the plug is pulled out of the mold. Note how the pink handle of the plug pulls on the 'S' shaped bar and finally the end of the bar pulls the plug out of the mold.
I know. It is really difficult to picture how this happens. I plan for the video to make it clear how to cut a mold like this.
Here is an image of the heat-cured silicone rubbers from Nicem (http://nicem.it) that I use for this mold. I prefer this rubber for this type mold because the shrinkage is the same across all the different rubbers from hard to supple.
Heat Cured Silicone mold with plug
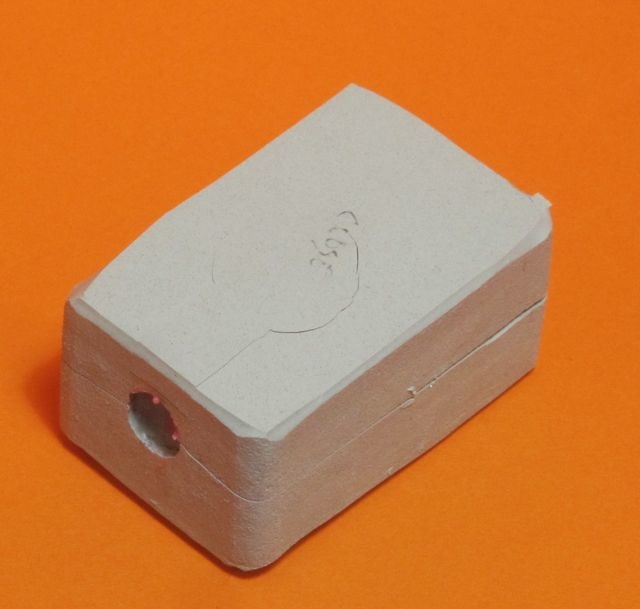
This ring mold is made with Zero-D Products HT40 and HT55 silicone mold rubber. This rubber has tiny metal flakes in it to increase its ability to conduct heat. This allows for quicker cooling and facilitates quicker injection/extraction cycles for the waxes. This first image shows the outside of the 1 7/8 x 2 7/8 x 1 3/8 heat cured mold. The mold has already been cut. Note the seam around the edge, plus the seam around the edge of the plug.
HT40 has a listed shrinkage of 1.8%. HT55 has a listed shrinkage of 1.6%. I wonder if the slightly different shrinkages causes the seams to open. It does not seem to make any difference when the mold is clamped shut - the seams disappear then.
The next three images illustrate the removal of the plug from the mold. I use this mold style when I have a lighter weight ring that will be warped by over eager extraction of the wax. That is, even if the wax is still a little soft because I did not wait long enough for it to cool, this mold cutting style will allow me to see the wax without warping it.
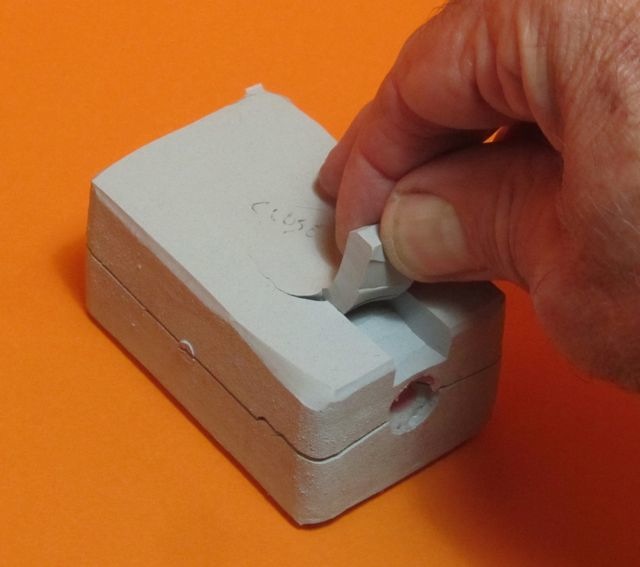
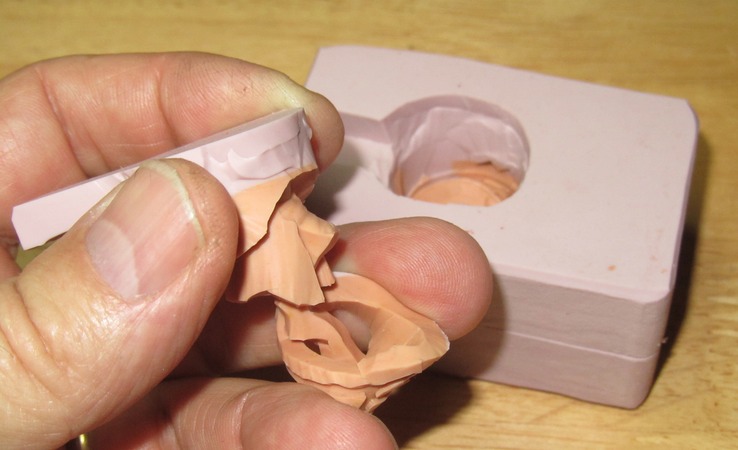
Note the plug between my thumb and index finger. Just below that is a confusing jumble of the plug that fits inside the ring. You can just see the pink wax in the shadow of the plug.
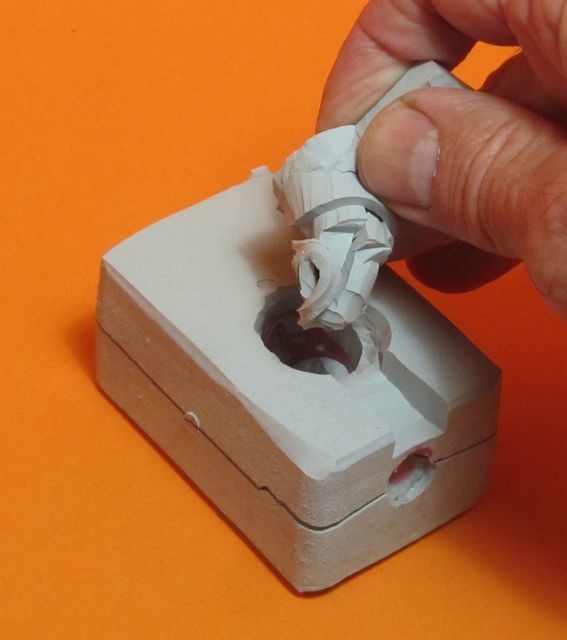
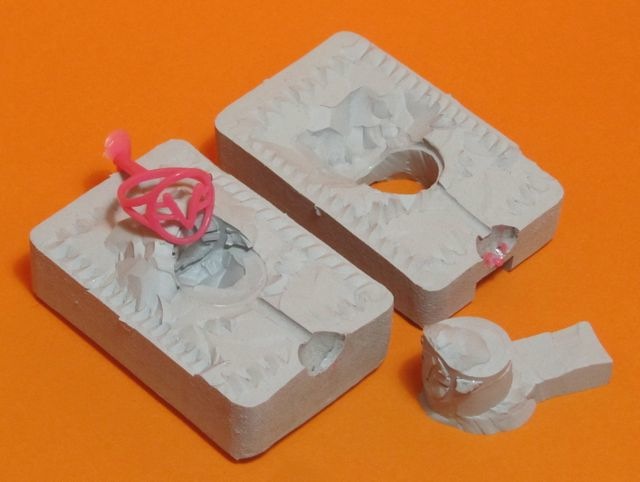
Plug is sitting upside down on top of mold. The loop that is off to the left of the plug is purposeful. That loop allows the mold to be extracted from the wax without warping the wax, even if the wax is still somewhat soft.

This image shows the loop replaced onto the plug. Note the faint seam visible between the loop and plug on the right inside edge of the plug.
The two halves of the mold almost fall apart once the plug has been removed.
The wax removed from the mold.
If you like this article and would like to see a video of this cutting method, please drop me an email. If there is enough interest, I'll shoot the video and post it.
The best mold compound
How and Why I choose a mold rubber.
The best way to choose a mold rubber is to
first consider the model that you are molding.
Answer these questions:
1. How delicate is the model - of what material is the model made?
a> is it wax, plant, or animal? (therefore fragile and heat
sensitive)
b> is it wood, stone, or metal? (more robust and not sensitive
to heats up to 350F (177C)
2. How quickly do you need a few waxes from the model?
a> less than an hour?
b> in a few hours?
c> next day?
3. Will you accept some shrinkage from the model to the production
item?
4. What sort of mold making equipment do you have?
a> Vulcanizer?
b> C-clamps, aluminum plates and aluminum mold frame?
c> Nothing? ie, no way of heat curing a mold?
5. What shape is the model?
a> light weight lady's ring (average thickness of less than
1 mm)
b> heavy gent's ring (average thickness of around 1 mm)
c> Thick belt buckle (average thickness of 3 mm and large-3
cm x 5 cm)
If the student doesn't know or doesn't care about these questions
and has a vulcanizer and mold frame, let them use natural rubber
to make their molds. Both silicone and natural rubbers produce good molds.
If the model is delicate, I tend to use a two part, room
temperature vulcanizing (RTV ) compound. There are many good
compounds on the market, RTV-RP from Zero-D, Freeman Jewel-Sil,
Castaldo Liqui-Fast, and Rio Ditto RTV compound.
These compounds require the use of a vacuum chamber to remove
bubbles from the mixture. They can be ready in 1 to 24 hours.
These compounds usually give a low shrinkage.
The quickest mold compound to use is a two part compound like
Castaldo Quiksil or Belicone Cold Molding Silicone Putty. They
cure in about 20 minutes. Equipment needed is a mold frame, 2 or 3
mm thick mold plates, and a C-clamp or two. These compounds are
said to be zero shrinkage.
Heat cured silicone mold compounds offer the most versatility.
There are a few temperature ranges available. The silicones that
cure between 160F (71C) and 190F (88C) are great for making molds
of the higher melting temperature carving waxes. Higher
temperature curing silicones are excellent for molding metal
models and heat resistant models. You will need a vulcanizer, mold
plates and a mold frame to cure these types of molds. A few
benefits of heat cured silicones are no silicone release spray is
needed to remove waxes from the molds; molds are durable enough to
make many thousands of waxes; inside of mold can be engineered to
include very soft to very hard areas allowing excellent injections
of very thin (0.5mm) waxes. Shrinkages from 0% to 4% are
available. See my mold compound comparison chart at http://www.flexiblejewelrymolds.com/material-comparisons.html
to find the mold compound that best suits your job.
Finally, mold compounds come in many durometers - softness and
hardness. Rubber bands are soft and about Shore 28 durometer. Car
tires are hard and about Shore 60 durometer. Pack your model with
soft silicone rubber around it, then surround that soft rubber
with harder rubber. When you extract the wax injection, the soft
rubber will 'let go' of the injection more easily without warping
it. The surrounding of hard rubber will allow you to inject the
wax at a higher pressure by containing that pressure.
Curved or Straight Scalpel Blade?
Ever wonder which blade is best? Me too!
Then I found out that they are both the best for making different cuts.
I use the curved scalpel for about 90% of the cutting that I do, and the straight scalpel for the other 10%.
The curved scalpel is great for making 'choppy water' cuts. That is how these many tiny locks or ripples in the molds are cut. The curved blade is also good for cutting larger, flat areas smoothly and quickly. It can be pulled carefully through a large area leaving a wide cut.
The straight scalpel is excellent for making precise cuts in narrow areas. Use it to slice bits of mold rubber that are bordered by more mold rubber that you don't want to cut. Often, using a curved blade to do this will allow you to cut not only with the tip of the curved blade, but also with the opposite end of the curve. It is better to avoid extra cuts in a mold.
I like to hold the straight scalpel blade handle like I'm holding a pen. I grip the handle with my thumb, index, and middle fingers. . The palm of the hand is below the scalpel handle. Here is what I see when cutting the inside section of a mold-in-mold. The mold is made with Nicem low temperature vulcanizing silicone rubber.
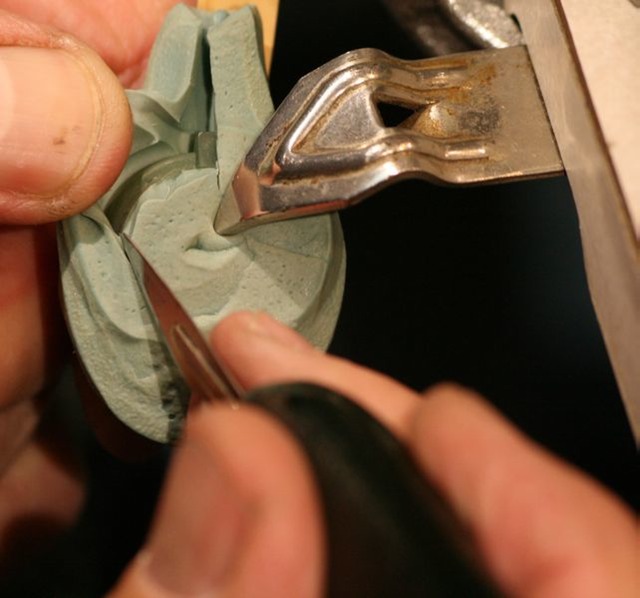
Figure 1.
I like to hold the curved scalpel blade handle like I'm holding a butter knife, or file. The thumb is peeking out just below the scalpel handle in this image. The index finger is closest to the blade. The middle finger is behind it on the left side of the image. The palm of the hand is above the scalpel handle. I'm cutting into the outside edge of a mold made with Castaldo VLT. It is a silicone rubber that vulcanizes at 160F! I bake green carving wax in this rubber just like in the Nicem rubber. See figure 2.
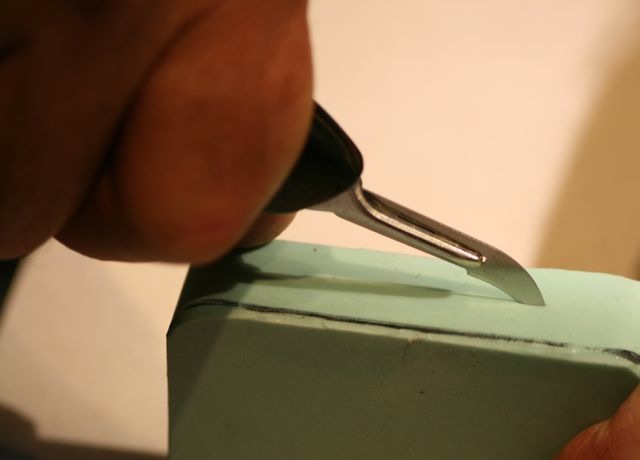
Figure 2.
Next article will be basic suggestions for choosing your jewelry mold rubbers.
Shrinkage in mold compounds
I was told at the beginning of my career to build in 8 to 12% shrinkage in my wax carved models to make the finished jewelry turn out the right size. How do we use the 4.0 to 0.0 % shrinkage figures we are given by the mold compound suppliers? Is the shrinkage consistent from a small mold to a large mold, a small model to a large model, from one red mold compound to the next red mold compound?
How do we compensate for this shrinkage? What is the conversion factor from model to mold for a given compound? Never mind how much the wax shrinks, the investment, nor the cast metal, nor the abrasive finishing processes. This is about shrinkage in mold compounds.
Method:
I test and compare two methods for determining shrinkage in the materials. One is using a single linear dimension in the mold, the other was an average of two dimensions at right angles to each other on the mold. I test compounds cured at the recommended vulcanizing temperature, and then at higher, or 'push cure' temperatures. I will also be testing RTV (room temperature curing) molds and compare them to the same RTV compounds cured at the manufacturers' recommended 'push-cure' temperatures.
I expect to answer the question: "Is the shrinkage in a mold material different when it is 'push cured'?
First up is Rio Ditto 2. It is a great, firm, RTV compound that push cures in a couple of hours at 300F. Or, you could wait 16 to 24 hours for it to reach full hardness at room temperature. Here is an image of the ruler I embedded in my mold:
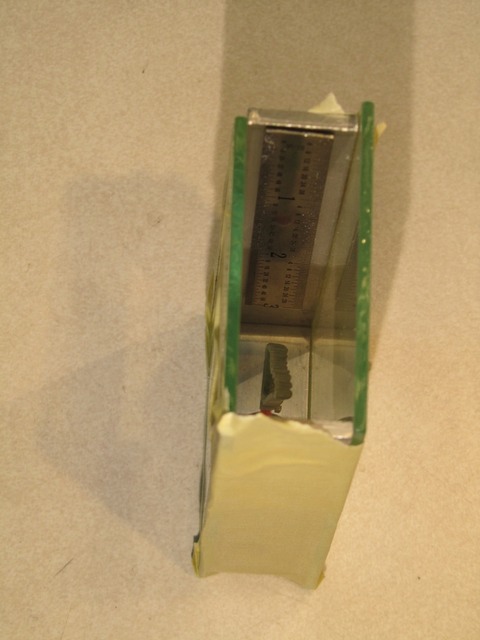
We are looking down into the top of the mold. The ruler is taped to the side of the mold frame. Green wax model is in the center of the mold frame. I like to use masking tape to hold the glass sides on the aluminum mold frame.
Results on this test will be available on the new shrinkage data spreadsheet soon.
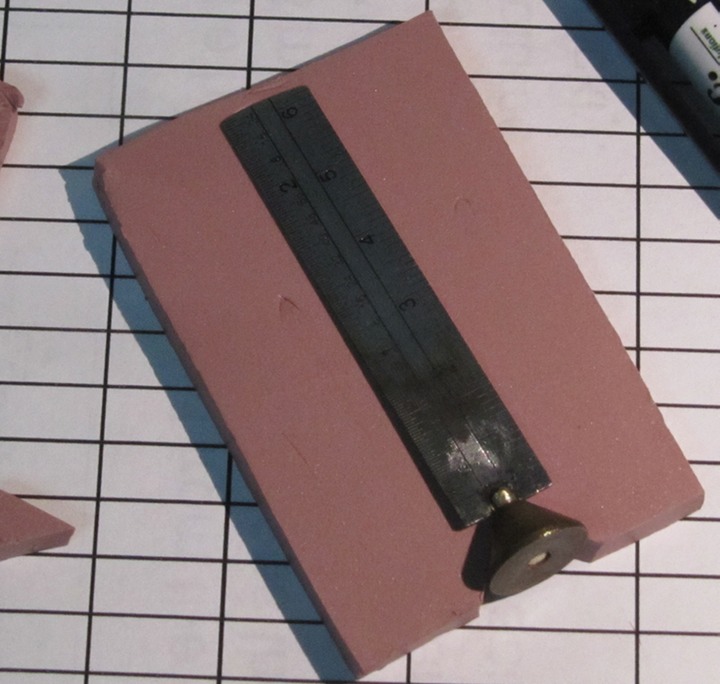
Here is an image of my first test of a heat cured silicone compound. I used Zero-D Products 'Zeroshrink'. It shows a section of stainless steel ruler on the mold compound. I'll vulcanize the mold and compare the shrinkage percentage I get off the length of ruler inside the mold to the shrinkage percentage I measure on the outside of the mold. I've always wondered how Castaldo and Zero-D measurement methods compare. :-)
Measuring Shrinkage
Evaluating Shrinkage in Mold Compounds
Shrinkage from the jewelry master to the final piece of finished jewelry depends on many variables. Shrinkage of the mold material is one variable we can isolate. We do this by vulcanizing a block of the mold material in a mold frame, then measuring the block and comparing it to the orginal dimensions of the mold frame.
Bill Mull at Zero-D Products advises:
“Measure the inside dimensions of your mold frame at room temperature. Use a vernier or dial caliper and take care to get the readings correct.
“Starting with everything at room temperature, very carefully measure the length and width of the vulcanized block. Avoid squeezing the rubber with the caliper. Record your dimensions to three decimal places and then calculate the shrink in both directions. The long dimension should show more shrink than the short dimension. Average the two and you will have a fair comparison.”
This gives us a method to compare the original length plus width of the inside of the mold frame to the vulcanized dimensions of the rubber block.
Michael Knight at Castaldo® uses a different method to measure shrinkage:
“We do it optically. No contact with the rubber. Take a mold frame, fill the bottom half with rubber, and then imbed a short section of a metal millimeter ruler in the rubber. Fill the rest of the mold frame with rubber, vulcanize and let it cool for a day to allow shrinkage to stabilize. Then compare the ruler with the impression in the rubber using a magnifying glass.
“The same rubber compound molded around the same metal master model can produce highly variable final casting shrinkage rates depending on the mold maker’s and caster’s skill, knowledge, precision and attention to detail. Perfection is not automatic.”
In fact, most mold compounds shrink. The injected wax shrinks. The investment shrinks. The cast metal shrinks. The surface of the cast piece is usually abraded and burnished in the polishing process so there is shinkage there. But awareness of the amount of shrinkage in a mold compound is where it all starts.
Knowing the basic shrinkage properties of your mold compound guides the model making process to success.. Compare the various shrinkage rates of molding compounds using the online mold compound comparison chart.
Novel RTV molding technique
I use RTV mold compound in my studio in a very frugal way. I learned this method from an attendee at the Santa Fe Symposium on Jewelry Manufacturing Technology (SFS) in the ’90’s. I’m very grateful to him for his suggestion. Sorry that I’ve forgotten his name. He has saved me quite a bit of money over the years and improved my wax injections of wax masters with this technique.
The first step is to take a grocery bag to your local camera and film processing store. Ask them if you can help them recycle their plastic film canisters. They usually say yes and give you a grocery bag full of empty canisters. The ones without internal ribbing are the best, though any of them will work.
Tools are:
a gram scale accurate to 0.1 gram, your favorite RTV compound, spatula, mixing bowl, a carving wax master, a bit of sprue wax, wax pen, masking tape and a film canister.
The wax should fit into the canister with a minimum of 7mm clearance all around. I’ve used larger diameter PVC pipe to make larger cylinder molds. It is easier to use the U shaped aluminum mold frames for larger waxes rather than use PVC pipe. Film canisters are frustrums - one end is a slightly larger diameter than the other. Great clamping pressure can be achieved by pushing the finished mold a little deeper into the canister prior to wax injection. The canister pushes in on the cylindrical mold supporting it against higher wax injection pressure.
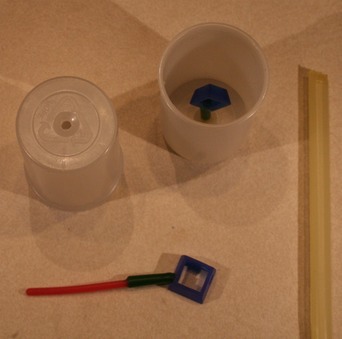
Figure 1: Blue wax square bezel with red sprue wax at bottom is the master. Round bottom of light gray film canister at left middle shows drilled hole into dome that makes a sprue former. Upper right shows film canister with blue wax master in place. Right side of image shows yellow sticky wax normally used to connect master sprue with bottom of canister.
Mold making procedure:
Drill a hole the diameter of the sprue wax in the little dome in the bottom of the canister. I wonder why they so conveniently pre-placed a sprue former in the film canister? Attach a 10 cm (2.5 inches) length of wax wire to the master. Thread the wax wire through the hole until the master is centered at the correct level in the canister. The correct level leaves at least a centimeter of space between the sprue former and the master. The correct level allows at least a centimeter of space between the master and the top of the film canister. Center the master in the available space for best results. From the outside of the canister, melt the sprue onto the edges of the hole in the bottom of the canister.
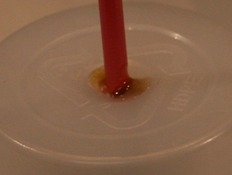
Figure 2 Wax sprue wire melted onto the edges of the hole in the canister.
While the sprue is still warm, turn the canister over and adjust the master so that it is centered in the canister. Add a line of wax on the insides of the canister to mark where the parting marks should go. This shows where to place your cut in case you are using an opaque RTV compound.
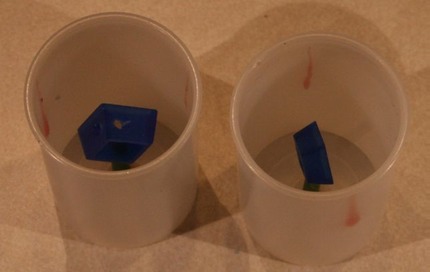
Figure 3 Two film canisters with blue wax masters positioned and almost ready for filling with RTV compound. Pink vertical lines inside canisters show where outside edges of molds should be cut.
Wrap a collar of masking tape around the top of the canister. This prevents overflow of the RTV compound when it is vacuumed in the canister. If the RTV is going to be “pushed”, that is, cured at a temperature higher than room temp, be sure to use sprue and attachment wax that melts at a higher temperature than the cure temperature!
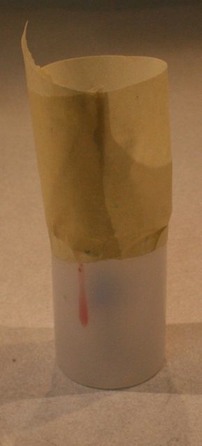
Figure 4 Canister with collar of masking tape around it.
Although I chose Freeman Clear silicone RTV mold compound for this demonstration, this next image shows the cream colored base and bright green catalyst of Smooth-On Mold Max 40 before mixing.
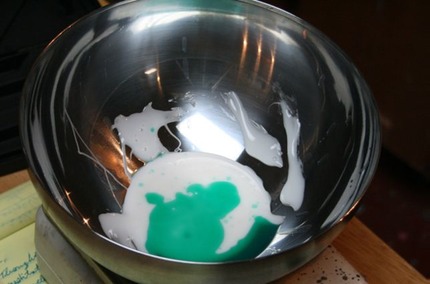
Figure 6. Note much larger mixing bowl to catch the foaming RTV compound as it expands during the vacuum de-airing.
Weigh and mix according the manufacturer’s instructions about 40 grams of RTV compound for one film canister mold. Vacuum de-air it in the mixing bowl for a couple of minutes after it rises and falls. Be sure to use a mixing bowl 5 times the volume of the mix. It rises a lot when first vacuumed. Fill the film canister to the plastic rim, covering the wax master. Re-vacuum the compound in the canister.
It is much easier to cut the canister off the outside of the cured mold cylinder than to try and save the canister. Remember, you have a whole grocery bag full of canisters.
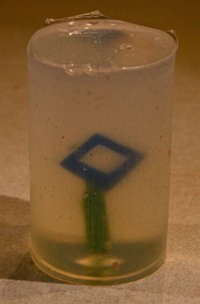
Figure 7 Transparent RTV compound with side view of blue wax master.
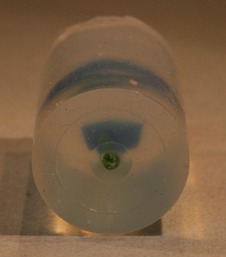
Figure 8 Transparent RTV compound with bottom view of blue wax master. Notice the green carving wax sprue on this master because mold was ‘pushed’ to 200F in order to cure it more quickly.
Cut the mold like you would any other mold, following the wax marks on the outside of the cured cylinder.
This video shows how I cut a cylindrical mold containing a similar master with prongs.
Cut 3 mm off the bottom of another canister identical to the one you just cut off your mold. Now you have your cylindrical ‘mold plate’ to hold the mold together as you inject wax into it. You can see how this works in the preceding video.
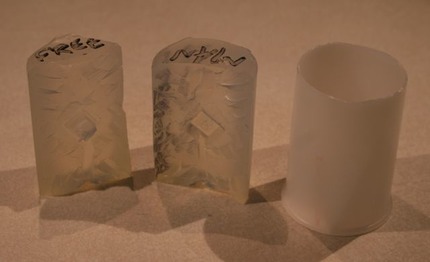
Figure 9 Two halves of the mold on the left. Film canister on the right with bottom cut out of it. The mold is supported inside the canister during wax injection.
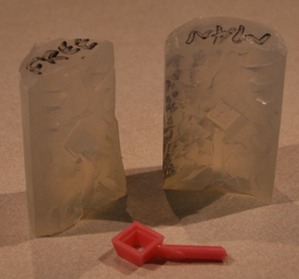
Figure 10 Two halves of the mold with pink wax injection below them.
When you are ready to inject the mold, powder the outside of the mold and the inside of the canister so that the mold will slide in and out easily. Inject some wax, add vents where needed, and have fun casting.
What's in a name?
Flexible Jewelry Molds gives the idea that these are special molds. I chose 'flexible' to let you know that I'm not talking about rigid, metal molds on this site. Molds on this site are heat-cured natural rubber, heat-cured silicone rubber, and room temperature vulcanized (RTV) molds.
These molds are flexible. Some are as soft as a rubber band. On the Shore A scale of hardness they are about 28 durometer. They can also be as hard or even harder than an automobile tire, about 60 durometer. See a graphic here on the Plastics International site to see the range of hardnesses in rubbers.
I try to make molds as hard as possible. The wax still has to come out of the mold without breaking or warping. This means that softer rubber might surround the interior and be supported by harder rubber on the outside. The harder the mold, the less it will deform when it is clamped prior to wax injection. We also want the interior of the mold to hold its shape in the flow of molten wax rushing into the mold cavity. This leads to faithful reproduction of the master in the form of waxes.
'Flexible' also refers to the idea that we need to be adaptable in the materials that we use to make molds. Perhaps a simple putty RTV mold will work on your master? Maybe a heat-cured natural rubber mold is needed to withstand a long production life. Silicone rubbers with different curing temperatures, a range of hardnesses and no need for release spray is probably the best choice for your master. What shape of mold frame will you use? Square, rectangular, round? The more experience you get, the easier it will be to find just the right combination of firmness and shape.
I hope that I can support you in all your mold making information needs!
Santa Fe Symposium on Jewelry Manufacturing Technology and "Flexible Mold Making"
I sent in my paper on Flexible Mold Making last night. Writing the paper inspired me to create this website.
Ever since the beginning of the internet I've made searchs for 'mold making', 'jewelry mold making','rubber mold for ring', 'rubber molds', 'bracelet mold', 'silicone mold', 'RTV mold'. I found interesting articles and more recently interesting videos. But - never encountered a single place on the 'net' where I could see how to make a variety of different molds.
My intention with this website is to compile all the different flexible mold making techniques in one place. I'll post videos and text descriptions. My hope is to create an online catalog for mold cutters to view all the different styles and materials used to make molds.
Heat cured natural rubber and silicone, as well as RTV (room temperature vulcanizing) molds will be demonstrated. Visit http://flexiblejewelrymolds.com/material-comparisons.html every week to see updates on the mold material comparison chart.
I hope to visit various mold material suppliers and interview them while touring their plants. I'll post those visits here. The better informed you are, the better decisions you can make!
Here is one of the pictures of an RTV mold made with Castaldo LiquiGlass that is not included in this year's paper:
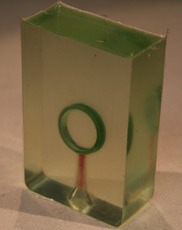
I turned the green carving wax master on my lathe. The paper does show this mold after it is cut and injected with a wax. I'll post an edited form of the paper after I've delivered the presentation in May, 2012. You may purchase the paper after it has been given from The Santa Fe Symposium Library of Presentations at https://www.santafesymposium.org/papers/index.php.