
I use RTV mold compound in my studio in a very frugal way. I learned this method from an attendee at the Santa Fe Symposium on Jewelry Manufacturing Technology (SFS) in the ’90’s. I’m very grateful to him for his suggestion. Sorry that I’ve forgotten his name. He has saved me quite a bit of money over the years and improved my wax injections of wax masters with this technique.
The first step is to take a grocery bag to your local camera and film processing store. Ask them if you can help them recycle their plastic film canisters. They usually say yes and give you a grocery bag full of empty canisters. The ones without internal ribbing are the best, though any of them will work.
Tools are:
a gram scale accurate to 0.1 gram, your favorite RTV compound, spatula, mixing bowl, a carving wax master, a bit of sprue wax, wax pen, masking tape and a film canister.
The wax should fit into the canister with a minimum of 7mm clearance all around. I’ve used larger diameter PVC pipe to make larger cylinder molds. It is easier to use the U shaped aluminum mold frames for larger waxes rather than use PVC pipe. Film canisters are frustrums - one end is a slightly larger diameter than the other. Great clamping pressure can be achieved by pushing the finished mold a little deeper into the canister prior to wax injection. The canister pushes in on the cylindrical mold supporting it against higher wax injection pressure.
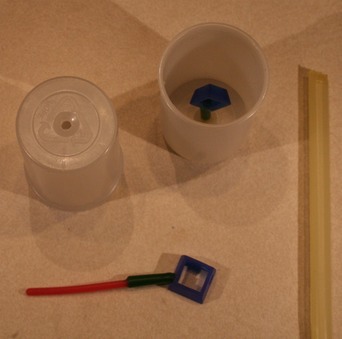
Figure 1: Blue wax square bezel with red sprue wax at bottom is the master. Round bottom of light gray film canister at left middle shows drilled hole into dome that makes a sprue former. Upper right shows film canister with blue wax master in place. Right side of image shows yellow sticky wax normally used to connect master sprue with bottom of canister.
Mold making procedure:
Drill a hole the diameter of the sprue wax in the little dome in the bottom of the canister. I wonder why they so conveniently pre-placed a sprue former in the film canister? Attach a 10 cm (2.5 inches) length of wax wire to the master. Thread the wax wire through the hole until the master is centered at the correct level in the canister. The correct level leaves at least a centimeter of space between the sprue former and the master. The correct level allows at least a centimeter of space between the master and the top of the film canister. Center the master in the available space for best results. From the outside of the canister, melt the sprue onto the edges of the hole in the bottom of the canister.
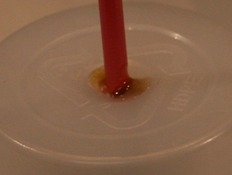
Figure 2 Wax sprue wire melted onto the edges of the hole in the canister.
While the sprue is still warm, turn the canister over and adjust the master so that it is centered in the canister. Add a line of wax on the insides of the canister to mark where the parting marks should go. This shows where to place your cut in case you are using an opaque RTV compound.
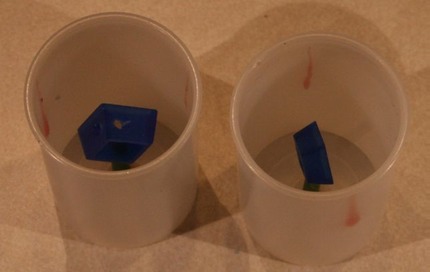
Figure 3 Two film canisters with blue wax masters positioned and almost ready for filling with RTV compound. Pink vertical lines inside canisters show where outside edges of molds should be cut.
Wrap a collar of masking tape around the top of the canister. This prevents overflow of the RTV compound when it is vacuumed in the canister. If the RTV is going to be “pushed”, that is, cured at a temperature higher than room temp, be sure to use sprue and attachment wax that melts at a higher temperature than the cure temperature!
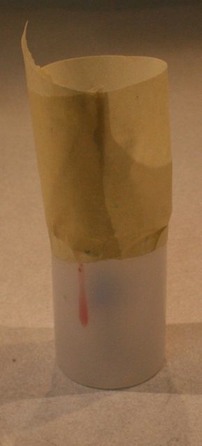
Figure 4 Canister with collar of masking tape around it.
Although I chose Freeman Clear silicone RTV mold compound for this demonstration, this next image shows the cream colored base and bright green catalyst of Smooth-On Mold Max 40 before mixing.
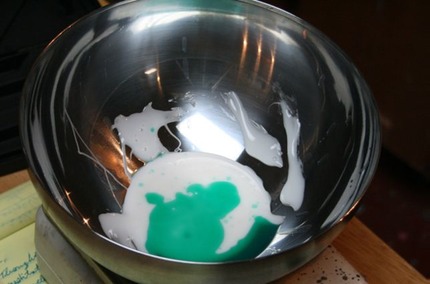
Figure 6. Note much larger mixing bowl to catch the foaming RTV compound as it expands during the vacuum de-airing.
Weigh and mix according the manufacturer’s instructions about 40 grams of RTV compound for one film canister mold. Vacuum de-air it in the mixing bowl for a couple of minutes after it rises and falls. Be sure to use a mixing bowl 5 times the volume of the mix. It rises a lot when first vacuumed. Fill the film canister to the plastic rim, covering the wax master. Re-vacuum the compound in the canister.
It is much easier to cut the canister off the outside of the cured mold cylinder than to try and save the canister. Remember, you have a whole grocery bag full of canisters.
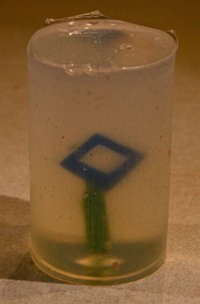
Figure 7 Transparent RTV compound with side view of blue wax master.
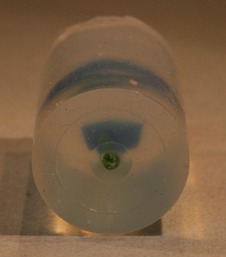
Figure 8 Transparent RTV compound with bottom view of blue wax master. Notice the green carving wax sprue on this master because mold was ‘pushed’ to 200F in order to cure it more quickly.
Cut the mold like you would any other mold, following the wax marks on the outside of the cured cylinder.
This video shows how I cut a cylindrical mold containing a similar master with prongs.
Cut 3 mm off the bottom of another canister identical to the one you just cut off your mold. Now you have your cylindrical ‘mold plate’ to hold the mold together as you inject wax into it. You can see how this works in the preceding video.
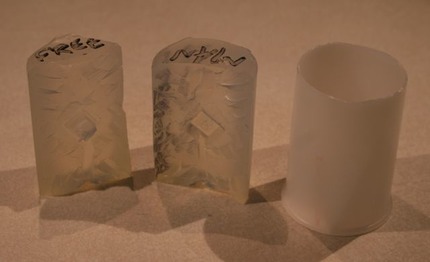
Figure 9 Two halves of the mold on the left. Film canister on the right with bottom cut out of it. The mold is supported inside the canister during wax injection.
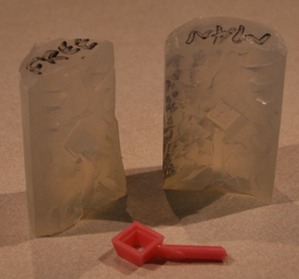
Figure 10 Two halves of the mold with pink wax injection below them.
When you are ready to inject the mold, powder the outside of the mold and the inside of the canister so that the mold will slide in and out easily. Inject some wax, add vents where needed, and have fun casting.